Google Tag Manager

Markdown

View as Markdown

Google Tag Manager (GTM) is one of those tools that helps to easily add HTML or Javascript snippets to your website. There are several advantages of using GTM to add the code snippet of your chatbot. You get a centralized management platform for all the snippets on your site. It's easier to manage multiple chatbots using their interface and you can even specify where and how those chatbots should be launched.

It is also easy for marketers to manage multiple javascript snippets on the site without the assistance of a web developer.

GTM works through a system of Containers, Tags and Triggers.

Tag: A tag is the snippet code that you add to your site.

Container: A container basically contains all the tags you have added to your website. When a new container is created, you get a container code from GTM. This will be the only code snippet that you add to your website directly. Everything else happens within GTM.

Triggers: A trigger can be any action on your website. For example, someone clicks on an outbound link, downloads a file, visits a certain page, etc. Every tag should be associated with a trigger, otherwise, the tag will not function.
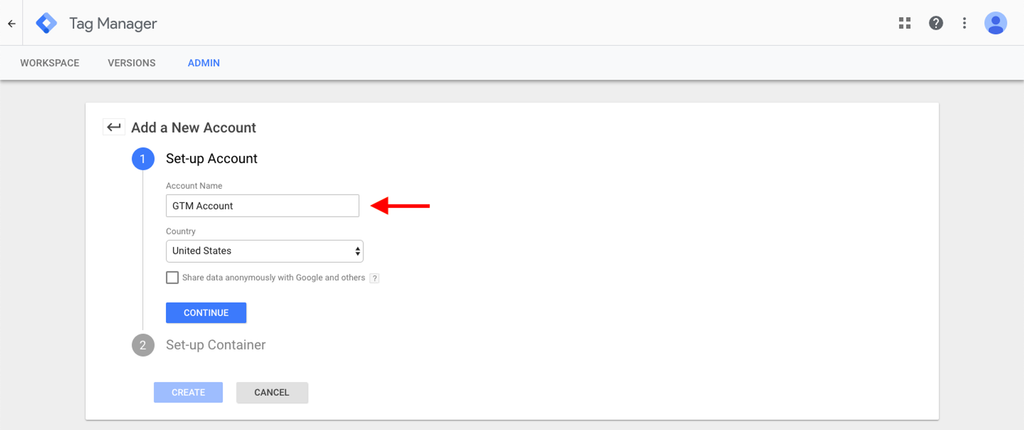
Setup a GTM Account

Go to tagmanager.google.com and create a new GTM account, if you don't have one already. Provide a name to your account.
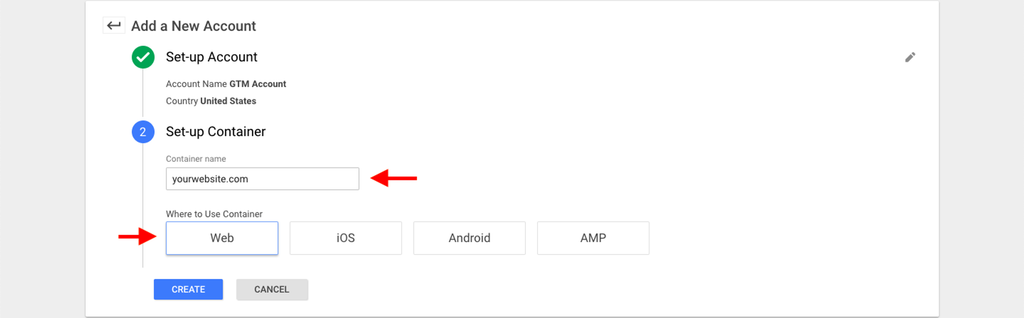
Setup the Container

Provide a name to your container. Preferably you can give your domain name. Choose "Web" and click on Create.

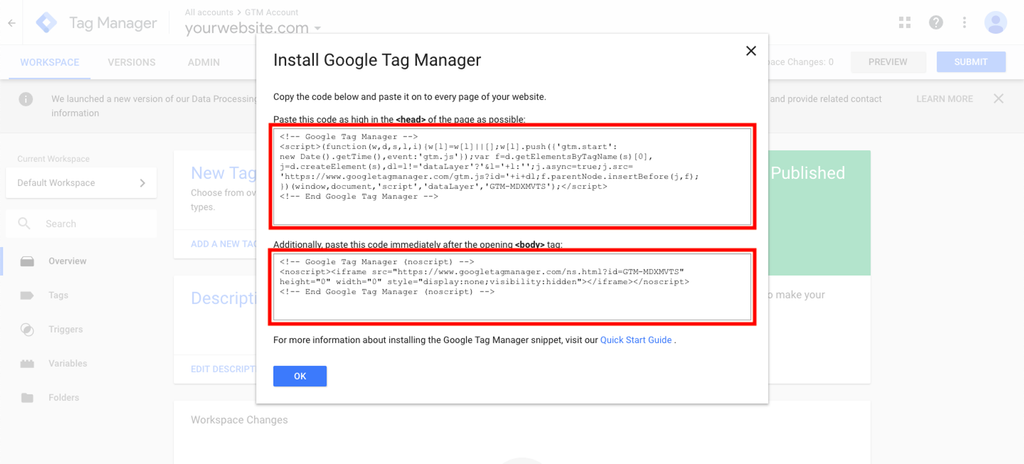
Next, you will have to accept the GTM terms and services and you will be shown your container code. It will have two parts and there will be specific instructions on where this has to be added. If you are using WordPress, then you can use a plugin to do this.

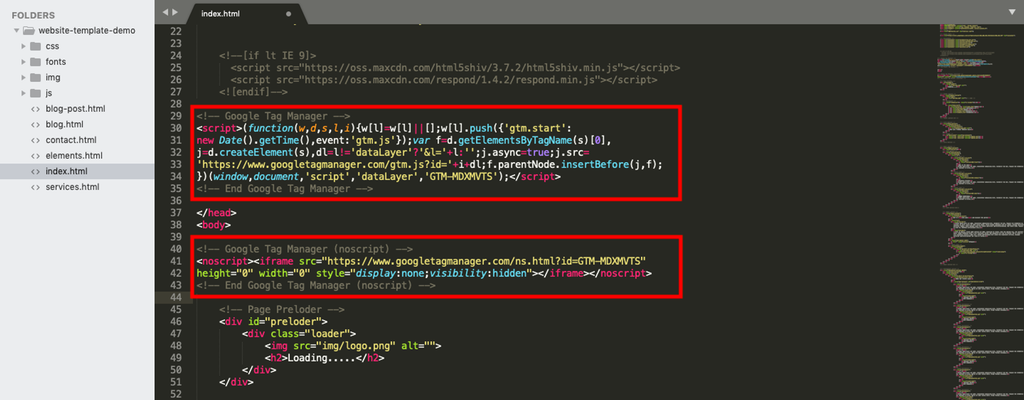
Add the Container Snippet to your Site

Here we are adding the container snippet to code a site that was made in native HTML.

Create a New Tag

Under Tags, click on New.

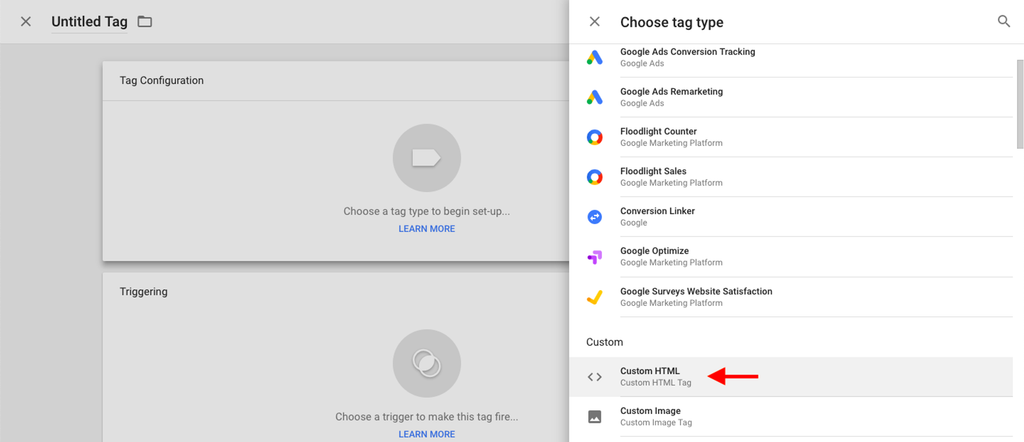
You have to choose the type of tag. For the purpose of adding the chatbot snippet code, we will use the Custom HTML option.

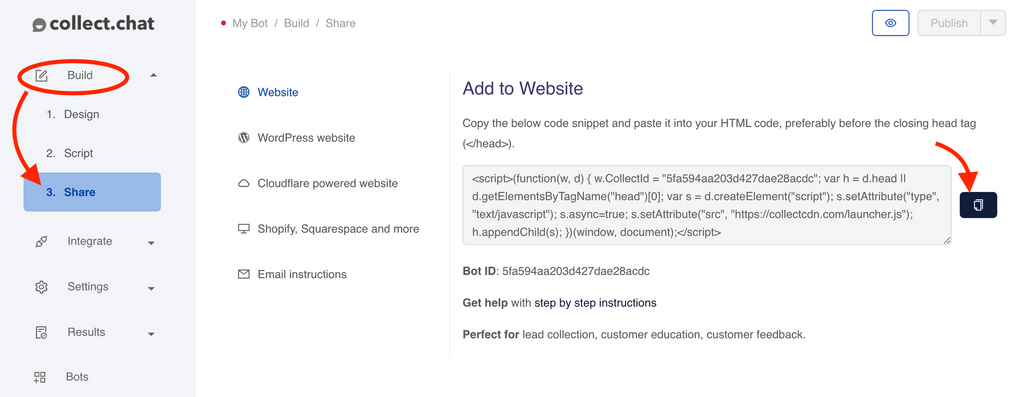
Copy the code snippet of your chatbot from your Dashboard > Build > Share.

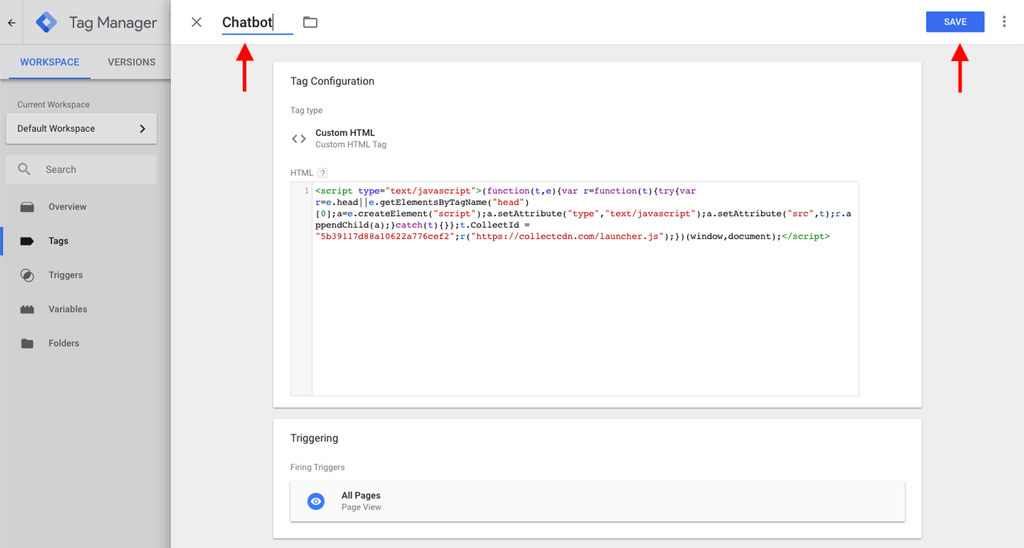
Paste the code snippet inside your tag.

Add a Trigger to your Tag

You need to add a trigger to your tag. The trigger will determine when the tag gets fired. You will find the option to add the trigger at the bottom.

There are many triggers available in GTM. Here we will use the All Pages trigger. This means that the current tag will be fired on all the pages of your site. You can create a new trigger using the "+" button in the corner.

Once the trigger is added, give your tag a name and click on Save.

Publish your Changes

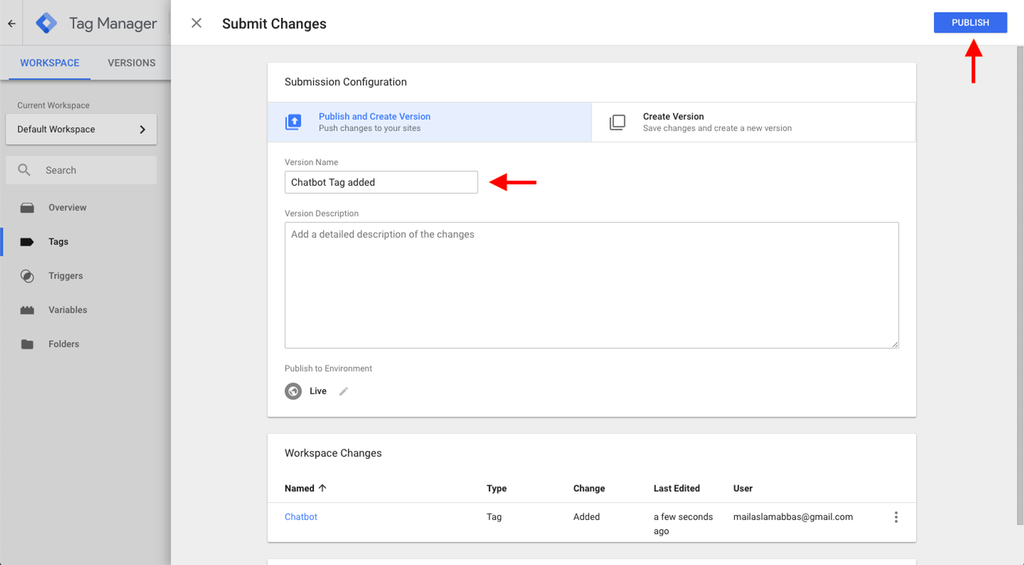
All the changes you have made inside your container will only become live once you publish it. For now, it's only in draft-mode. Click on Submit to proceed.

Changes you make to your container are saved as versions. Give a name to your version and click on Publish.

Now, go to your website to see if the chatbot is working on all pages. Make sure that the GTM container code is added on all pages. The tags will work only on those pages where the container code has been added.

Data Layer Variables

For those who wish to trigger tags depending on chatbot actions like chatbot open or close, etc, you can make use of the following data layer variables. These data layer variables are consistent with our Google analytics events.

Event triggered on widget open

{
“event”: “CollectChatView”
“page”: “”
}

Event triggered on each message

{
“event”: “CollectChatMessage”
“page”: “”
}

Event triggered on conversation complete

{
“event”: “CollectChatComplete”
“page”: “”
}

Tips

You can use GTM to customize how the bot appears on your site using triggers. Here are some examples.

  • You can fire the chatbot based on how much the user has scrolled through the web page using the Scroll Trigger.

  • You can fire the chatbot when a special link is clicked using the Click Trigger.

  • Using the Page View trigger, you can fire different chatbots on different pages. Create tags for each chatbot and set the Page View trigger accordingly.

  • You can choose to show the entire widget after a period of time using the Timer Trigger.

  • If you want to fire the bot based on dynamic elements that appear on your web page, you can use the Element Visibility Trigger.


Still need help?

Contact us

Was this article helpful ?

Still need help?

Contact us

General

General

How to create your first chatbot with Collect.chatGoogle Tag ManagerMailChimpShow or Hide the bot based on URLSet up custom domain for chatbot pageEmail NotificationsResponse StatusWhere can I get my Invoice?Facebook PixelSend the data to your server using webhookGoogle CalendarIs there a discount?How to add chatbot to BigCommerceTranslate your ChatbotLogical JumpGoogle SheetsSalesforceMultiple Emails and RoutingFreshdeskIntegromatMy payment has failed, what to do?What is a response?I am getting spam responsesZapierWhat happens when I upgrade or downgrade?LeadsBridgeGoogle AnalyticsWhy am I not getting email notifications?How to add billing address to my invoice?Webhook in my chatbot is not workingThe changes I made to my chatbot are not visibleWhat is your refund policy?Why is my chatbot not showing up on my website?Do you have a trial account?How to add chatbot to WordPressHow to cancel my account?How to add chatbot to Medium BlogsHow to add chatbot to ShopifyHow do you charge us?How to add chatbot to CloudflarePermanently remove my chatbotHow to make the payment?How to add chatbot to NotionCan I use Collect Chat for free?What happens when I cross the response limit?How to add chatbot to Mobile AppHow to add chatbot to WeeblyHow to add chatbot to TumblrHow to add chatbot to SquarespaceHow to add chatbot to WixShare chatbot as a Landing PageHow to add chatbot widget to WebsiteConversational Marketing Chatbots and Collect.chatHow Chatbots work inside a WebsiteHow to embed chatbot in a webpageDesign a conversational landing pageCreate a copy of the botAdd a custom avatarCan I block responses from an IP address?How to add a welcome message to chatbot widget?Add a video from LinkedIn to the chatbotStop saving data on Collect.chat's serverAdd slides from SlideShare inside the chatbotAdd a video to the chatbotCan I customize the speed of the conversation?Validate phone number inside chatbotHow to capture email addresses?Open the chatbot if user is about to leaveShow or Hide the bot based on ReferrerAddress users by name using variablesEdit the chatbot conversationShow or Hide the bot based on LanguageHow to design my chatbot?Add an image to the chatbotShow or Hide the bot based on API parametersShow or Hide the chatbot based on deviceShow or Hide the bot based on CountryShow or Hide the bot based on UTM tagsShow or Hide the bot based on Operating SystemManage the date and time of when bot has to appearHow to target my users?Show or Hide the bot based on browserOpen the chatbot as the user is scrolling downTeam CollaborationShow or Hide the bot for repeating visitorsHow to hide the chatbot for a user who has already given answersOpen the chatbot widget based on a timerRedirect to a URL based on user choiceWhat is a Script Type?Add data from URL parameters inside a conversationWhatsApp typeOpinion Scale TypeAppointment typeFile Upload TypeThank You TypeText Question TypePhone Number TypeSet up custom domain for chatbot pageRange TypeLinks TypeNumber TypeDate TypeMessage TypeRating TypeEmail TypeAdd live chat supportMulti Select TypeList TypeCapture UTM parameters from URLsSend data from chatbot to pre-fill a webpageTrigger chatbot from a Link or ButtonMulti Choice TypeHide welcome message in mobileHide welcome message for repeating visitorsHow can I analyze my data?Load a new chatbot for repeating visitorsHow to edit my personal information?Add custom messages to the conversationTrack your chatbot using custom analyticsAdd custom data in chatbot responseIdentify a user in Email or SMS campaignsDynamic web pages based on user choiceHow to enable developer options when the chatbot type is Embed?Invoke a new chatbot on the same webpageOpen the chatbot instantly on page loadDo you have an API or tools for developers?Can I export my data?Why do I see symbols in my exported CSV?Do you have support for RTL languages?How to accept only business emails?How to get IP address of chatbot userWhat does your Unlimited Plan offer?How to accept payment via the chatbot?In WordPress, how can I embed a chatbot inside a page or a post?In WordPress, how can I add a different chatbot for a different page?How to trigger a bot from a WordPress Menu?In WordPress, how can I control the behaviour of the bot?How to change my email address?Publish the chatbotHow to be an affiliate?How to change metadata for chatbot pageCan we make a messenger chatbot?Are you GDPR compliant?Can I use multiple chatbots on my websites?Where can I see my Bot ID?How to change my password?Hide welcome message everywhereSetup different chatbot on different pages of the websiteTemporarily disable my chatbotRedirect to a page when conversation endsMulti Select and Multi Choice, what's the difference?Copy a MessageHow to add chatbot to WordPressIn WordPress, how can I embed a chatbot inside a page or a post?WhatsApp typeHow to trigger a bot from a WordPress Menu?In WordPress, how can I control the behaviour of the bot?Send the data to your server using webhookIn WordPress, how can I add a different chatbot for a different page?Welcome to the AI-first Help.Center!Welcome to the AI-first Help.Center!